In the last tutorial, you installed PostgreSQL and prepared all the tools needed for SQL development. Also, you learned some fundamentals such as meta-commands, created your first database, your first table, and wrote your first SQL statements to perform CRUD operations.
For the sake of simplicity, I omitted many important details on purpose. Bringing everything at once would be overwhelming and a bit distracting. Now, we’ll go over the basics again in more detail and continue creating the database for our digital store.
If you want to go over the previous articles, here’s the list:
Creating new roles and users
As I mentioned before, logging in as a superuser and using it for all your database activities isn’t a good practice. We will create a new role (or user) to work with from now on. This is both good practice and a chance for you to learn managing roles and their attributes!
Creating a new role is done using CREATE ROLE command, followed by the name of the role. Any attributes you want to give to the role are provided as arguments to this command.
Let’s create a new role called a manager to manage our store, but you can name it whatever you like. The command to do so is as follows:
CREATE ROLE manager LOGIN CREATEDB PASSWORD 'yourpassword';
You also notice three arguments after the role’s name: LOGIN, CREATEDB, and PASSWORD. These are attributes given to the newly created role. What they do is:
LOGIN: enables the role to be used as a user account and login to a Postgres server.PASSWORDis used to set the password for the user.CREATEDBenables this user to create new databases on the server.
There are many other attributes you can specify when creating a new role. They are used for more advanced stuff and are out of the scope of this tutorial. If you wish, you can always refer to the documentation.
Now, you can log in using the newly created user from the command line:
psql -U manager -d postgres
Then you will be asked for the password.
You may be wondering why there is -d postgres argument to the command. The reason is, by default, PostgreSQL tries to connect you to a database that has the same name as the user you are using to log in. When connecting using postgres user, you don’t specify the database name because you will log in and connect to the already-existing database called postgres.
If you try the previous command without specifying the database name, Postgres will try to log you in as a manager and connect you to a database named manager, but this database does not exist.
Postgres will throw the following error:
psql: FATAL: database “manager” does not exist
Next, when you create your database, you can specify it instead of postgres.
You may still be confused by the interchangeable use of the words “role” and “user” here. A user is just a role with the LOGIN attribute given to it, enabling you to log in using that role/user.
Creating databases
Last time you created a database using CREATE DATABASE command. Every database must have an owner. The owner can be specified when creating the database using the OWNER keyword. If no owner is specified, the current user is set to be the owner by default.
Now that you have a new user, you can create a store database and be its owner.
If you are already logged in as the manager user, you can write:
CREATE DATABASE store;
If you are logged in as a different user (such as postgres), you can explicitly specify the owner:
CREATE DATABASE store OWNER manager;
Now you have your database, and it is owned by the user you created!
To connect to it, you can use the \c meta-command or type the following in the command line:
psql -U manager -d store
Tables, in-depth.
Your user and database are ready, now let’s move to tables again! This section will introduce important (yet simple) topics at the core of relational databases, so give it all your attention.
Data types
If you coded in any programming language before, you must be familiar with the concept of data types. Similarly, SQL can store different types of data. Each column in a table is given a specific data type when the table is created. All the rows in the table should contain the same type of data for that column.
Postgres has native support for many different data types. Some are basic ones, while others are more specialized. You can check the data types documentation to find a complete list. The following table lists the basic and most used data types:
Basic data types in PostgreSQL
| Name | Alias | Definition |
|---|---|---|
| integer | int, int4 | signed four-byte integer |
| smallint | int2 | signed two-byte integer |
| bigint | int8 | signed eight-byte integer |
| serial | auto-incrementing integer | |
| double precision | float8 | double precision floating-point number (8 bytes) |
| boolean | bool | logical Boolean (true/false) |
| character(n) | char(n) | fixed-length character string of length n |
| text | variable-length character string |
You can either specify the column’s data type using the name or the alias. Aliases are supported for historical reasons and backward compatibility.
As you have seen in the previous article, data types are specified at the time of creating the table after each column’s name:
CREATE TABLE products (
	id INTEGER,
	name TEXT,
	price DOUBLE PRECISION,
	quantity INTEGER
)
You can add more columns to the table as you see fit and needed.
In these tutorials, I aim at showing you what you can do with SQL. What you do with it and how you do it is totally up to you. Actually, you shouldn’t see this as a set of instructions to follow. Instead, it would be best to develop your solutions for structuring the database, the tables, and the relationships among them. This will help you acquire valuable databases design skills and learn to navigate the official documentation to find what you need.
Default values
In some cases, you may want to specify a default value for a column. This value is used when no value is given when inserting a new row into the table.
To specify a default value for a column, use the DEFAULT keyword. If you want to set a default value for the price column, you can write:
CREATE TABLE products (
	id INTEGER,
	name TEXT,
	price DOUBLE PRECISION DEFAULT 9.99,
	quantity INTEGER
)
If you insert a new row using the INSERT command and omit the price column, it will have a default value of 9.99.
Constraints
Sometimes you need to impose some constraints on what goes into your tables. For example, the price and quantity columns shouldn’t contain negative values. Another important constraint you may want to have is for the id. Since each product must have a unique ID, this column shouldn’t be null and unique for every row. This is achieved by using different constraints provided by SQL.
Check constraints
The simplest constraint is the check constraint. It ensures that the data that goes into your table verifies a Boolean expression. If you want to have a constraint on the price column to make it accept positive values only, you can write:
CREATE TABLE products (
	id INTEGER,
	name TEXT,
	price DOUBLE PRECISION DEFAULT 9.99 CHECK (price > 0),
	quantity INTEGER
)
If you try to insert a row with a negative value for the price, you will get a constraint violation error.
You can also check different columns against each other. Suppose, for some reason, you have a limitation on the quantity you can store for a certain product, and you store this information in a column named max_quantity. The quantity column should always be less or equal to max_quantity. To implement this, you can write:
CREATE TABLE products (
	id INTEGER,
	name TEXT,
	price DOUBLE PRECISION DEFAULT 9.99 CHECK (price > 0),
	max_quantity INTEGER,
	quantity INTEGER CHECK ( quantity <= max_quantity )
)
Now, whenever you try to insert a row where quantity is larger than max_quantity, the insertion will fail, and you will get an error.
Not-null constraints
Sometimes, you want to ensure that all information is provided when inserting new pieces of data. For example, it doesn’t make sense to have products without an id, a name, price, or null (empty) cells. To prevent this, the NOT NULL constraint is used:
CREATE TABLE products (
	id INTEGER NOT NULL,
	name TEXT NOT NULL,
	price DOUBLE PRECISION DEFAULT 9.99 CHECK (price > 0) NOT NULL,
	max_quantity INTEGER,
	quantity INTEGER CHECK ( quantity <= max_quantity )
)
Unique constraints
You may have noticed that nothing prevents you from inserting two rows with the same value for the id column. Practically, this shouldn’t be possible. This column is used to identify the rows. Each row should have a unique and non-null value for the id. To enforce this, SQL provides the UNIQUE constraint. To make this column both unique and not null, we add this constraint alongside NOT NULL:
CREATE TABLE products (
	id INTEGER UNIQUE NOT NULL,
	name TEXT NOT NULL,
	price DOUBLE PRECISION DEFAULT 9.99 CHECK (price > 0) NOT NULL,
	max_quantity INTEGER,
	quantity INTEGER CHECK ( quantity <= max_quantity )
)
Primary keys
In simple terms, a primary key is a column that serves as a unique identifier for our rows. We already achieved this by combining UNIQUE and NOT NULL constraints. SQL provides a PRIMARY KEY constraint, which is functionally the same as combining the previous two constraints. We can write instead:
CREATE TABLE products (
	id INTEGER PRIMARY KEY,
	name TEXT NOT NULL,
	price DOUBLE PRECISION DEFAULT 9.99 CHECK (price > 0) NOT NULL,
	max_quantity INTEGER,
	quantity INTEGER CHECK ( quantity <= max_quantity )
);
In relational databases theory, every table should have one primary key. Although Postgres does not enforce this, it is a best practice to do so.
Although our table is now as it should be, there is still a small problem, or rather, an inconvenience. Making the id column an INTEGER and adding the PRIMARY KEY constraint will ensure that every row has a unique, numerical identifier. This integer identifier is usually incremental and starts at 0.
You must choose an id for each row you insert in the database with the current table design. It means you have to keep track of the id of the last row and increment this by 1, then use the new value. As it turns out, it’s is very inconvenient in practice.
Luckily, Postgres provides SERIAL data type. When we use this type instead of INTEGER, Postgres will automatically increment and assign a new primary key for every new row. This is much more convenient to use. Now the command to create the table is very similar with only that minor change:
CREATE TABLE products (
	id SERIAL PRIMARY KEY,
	name TEXT NOT NULL,
	price DOUBLE PRECISION DEFAULT 9.99 CHECK (price > 0) NOT NULL,
	max_quantity INTEGER,
	quantity INTEGER CHECK ( quantity <= max_quantity )
);
The products table looks good enough now! We can move on and try to create the other tables for our store as we discussed earlier. Now, you can use what you learned to create the clients table.
Again, I encourage you to think about it and develop your own solution using what you have learned so far. One example can look like this:
CREATE TABLE clients (
	id SERIAL PRIMARY KEY,
	first_name TEXT NOT NULL,
	last_name TEXT NOT NULL,
	address TEXT NOT NULL,
	phone TEXT,
	email TEXT
);
Here, I created an id column to identify individual clients. Each client has a first_name and last_name that cannot be null, of course. Also, there is an address column. If you ship your products to the clients, each client must have an address, and it cannot be null. Finally, you may want additional details such as phone number and email address that are not mandatory.
Before you go on and create the purchases table, you need to learn about foreign keys.
Foreign keys
Foreign keys are another kind of constraint that is related to primary keys. A column with a foreign key constraint is a column that contains a reference to the primary key from another table. If this wasn’t very clear, let’s try to understand it using a practical example.
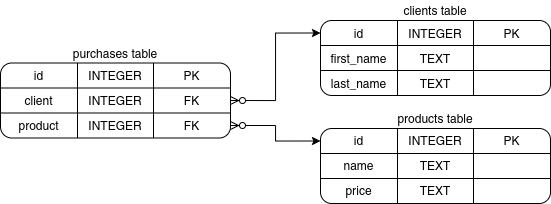
The purchases table is used to keep track of the orders made by the client. Each row in this table should contain two references:
- One reference to the
clientstable to identify the client who made the purchase. - Another reference to the
productstable, to specify which product was purchased by the client.
This reference (foreign key column) must be valid. It means that the foreign key should reference an already existing row in the referenced table. It can also be null, which means there is no reference.
The following diagram explains this relationship visually:
A foreign key constraint is created using the REFERENCES keyword followed by the name of the table to be referenced. To create the purchases table, you can write:
CREATE TABLE purchases (
	id SERIAL PRIMARY KEY,
	client INTEGER REFERENCES clients,
	product INTEGER REFERENCES products
)
Foreign key creates what is called in database language a many-to-one relationship. This means that many rows from one table (purchases) can reference a single row in another table (clients or products).
Deleting or updating a referenced column
Imagine if one of our clients wanted to delete his account. This client made several purchases in the past, so his ID exists in several rows in the purchases table as a foreign key. Now we want to delete these purchases. One solution is to search for them and delete them manually, but this is not very practical, right!
Fortunately, SQL provides us with a standard way to handle such situations. You can choose a certain behavior or action which will be executed when the referenced row is deleted. This is done using the ON DELETE option followed by the action you want to execute. You have few actions to choose from:
CASCADE: When the referenced row is deleted, the row (or rows) referencing it will also be deleted.RESTRICT: If the row is referenced, this will prevent its deletion altogether.SET DEFAULT: The foreign key will be set to the chosen default value if the referenced row is deleted.SET NULL: The foreign key will be set to null if the referenced row is deleted.
Let’s see a couple of practical examples.
So to delete all the purchases made by a certain client when the client is deleted from the clients table, you can write:
CREATE TABLE purchases (
	id SERIAL PRIMARY KEY,
	client INTEGER REFERENCES clients ON DELETE CASCADE,
	product INTEGER REFERENCES products
)
Similarly, what if a product is about to be deleted from the products table, which is present in an active purchase. This shouldn’t happen because the product is being ordered.
For this, you can use RESTRICT option as I explained and write:
CREATE TABLE purchases (
	id SERIAL PRIMARY KEY,
	client INTEGER REFERENCES clients ON DELETE CASCADE,
	product INTEGER REFERENCES products ON DELETE RESTRICT
)
This will prevent the deletion of the referenced row.
In addition to ON DELETE, SQL also provides ON UPDATE. They both accept the same options, but the latter is used when the referenced row is updated rather than deleted.
Conclusion
In this article, we went into more detail about tables, data types, and relations between entities. Now you: design and create more practical databases and tables. But that’s just the beginning! In the next part, you will discover and learn more advanced things related to querying and performing operations on data.